
Above is a paper cupcake baking cup garland. It turned out darling! I used 3 different designs. All you have to do is get a needle, thread some thick thread, or fishing line through it, and then slide the cups right on. String them facing different ways in a random pattern. Make it as long as you want and hang it up! This is a really fun decoration for a Birthday party, baby shower, wedding shower, or any kind of party. Red, White, and Blue would look so awesome for a 4th of July BBQ!
 These little cupcake picks really add a lot to a cupcake. These are baby bottles that I cut out with my cricut and then hot glued to a tooth pick and stuck it right into the cupcake. Perfect for a baby shower! For a Birthday party you could personalize it for the Birthday girl or boy. My daughter loves everything pink, so for her Birthday I did a sparkly pink and turquoise present cut-out on a toothpick. She loved it! You could do princess crowns, dinosaurs, cars, whatever...the possibilities are endless! Once again....think Red, White and Blue for your summer BBQ!

Next are my very favorite party decorations! I love them so much because they are HUGE! I can't think of a better way to add a pop of color to a room than with these. I am sure you have all seen these, but if not, here is a quick tutorial on how to make an awesome "puff ball". 1- see above picture...take 8 sheets of tissue paper and lay them on top of each other. Then fold them into a 1 1/2 inch fan. Then I like to loosely tape the middle. then tie a long piece of fishing line in the middle.

2- Start to carefully pull each piece away from the other. alternate sides.

3- Now you have one half done! ow do the other side the same way. When you have done both sides you have your "puff ball!" You will have to move each piece around a little until it looks nice and full.

4- Hang them up and enjoy!

My last idea for this post is a little thing I did this week for my daughter Brielle's Birthday. I wanted to make her feel special on her special day so I cut her name out with my cricut, and then just used some cute clothes pins that we painted and hung them up on a pennant banner that we already had hanging on the fireplace. I love when you can add to an existing decoration.
 This is a really easy way to decorate for someones Birthday without spending much time or money. Think of a way to add their name, or favorite thing to your current decor. This way, it looks great. like you spent lots of time, but really you just embellished an existing look. Also...It does away with those cheesy dollar store Birthday signs! YAY! (sorry if you love those!)
 These little cupcake picks really add a lot to a cupcake. These are baby bottles that I cut out with my cricut and then hot glued to a tooth pick and stuck it right into the cupcake. Perfect for a baby shower! For a Birthday party you could personalize it for the Birthday girl or boy. My daughter loves everything pink, so for her Birthday I did a sparkly pink and turquoise present cut-out on a toothpick. She loved it! You could do princess crowns, dinosaurs, cars, whatever...the possibilities are endless! Once again....think Red, White and Blue for your summer BBQ!
Next are my very favorite party decorations! I love them so much because they are HUGE! I can't think of a better way to add a pop of color to a room than with these. I am sure you have all seen these, but if not, here is a quick tutorial on how to make an awesome "puff ball". 1- see above picture...take 8 sheets of tissue paper and lay them on top of each other. Then fold them into a 1 1/2 inch fan. Then I like to loosely tape the middle. then tie a long piece of fishing line in the middle.

2- Start to carefully pull each piece away from the other. alternate sides.

3- Now you have one half done! ow do the other side the same way. When you have done both sides you have your "puff ball!" You will have to move each piece around a little until it looks nice and full.

4- Hang them up and enjoy!

My last idea for this post is a little thing I did this week for my daughter Brielle's Birthday. I wanted to make her feel special on her special day so I cut her name out with my cricut, and then just used some cute clothes pins that we painted and hung them up on a pennant banner that we already had hanging on the fireplace. I love when you can add to an existing decoration.
 This is a really easy way to decorate for someones Birthday without spending much time or money. Think of a way to add their name, or favorite thing to your current decor. This way, it looks great. like you spent lots of time, but really you just embellished an existing look. Also...It does away with those cheesy dollar store Birthday signs! YAY! (sorry if you love those!)
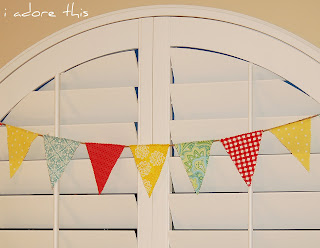 We didn't even use a sewing machine! Here is a quick tutorial on how to make your own pennant banner:
