Thanks for visiting us here at I Adore This.

This blog is dedicated to sharing things that i adore!. You will usually find a quick tip or trick on how to update or change furniture, decorations or crafts but depending on my mood you will also be exposed to storage ideas, management tips and all other types of things that come with raising and interacting with little girls.


Monday, March 28, 2011

Stencil Project #2

I have been searching all over the world for the perfect fabric for my living room curtains. When I realized that it just doesn't exist, I decided to do what? That's right....I made some! I really wanted a BIG print, and it had to be the right colors too. This is impossible!! I saw some curtains that I loved in the Ballard home decor magazine, and I feel in love with the idea of the large print, but I did not fall in love with the price! After doing some soul searching, I decided that I would stencil the darn things!
I found this awesome stencil at Hobby Lobby for right around 5 bucks! I bought the giant stencil brush this time so that it would cover more area more quickly. It was a great purchase....it worked great! All that I needed now was to decide on the color. I chose a metalic gold color. Good choice! I almost forgot the most important part....the curtain. You could always use a sheet, a table cloth, a solid color of fabric, of just a boring old solid curtain. I used a plain white curtain from Ikea. It was cheap, like 16 dollars for both panels! This whole project ended up being about 26 bucks! (that doesn't include the hanging hardware, I already had that.)
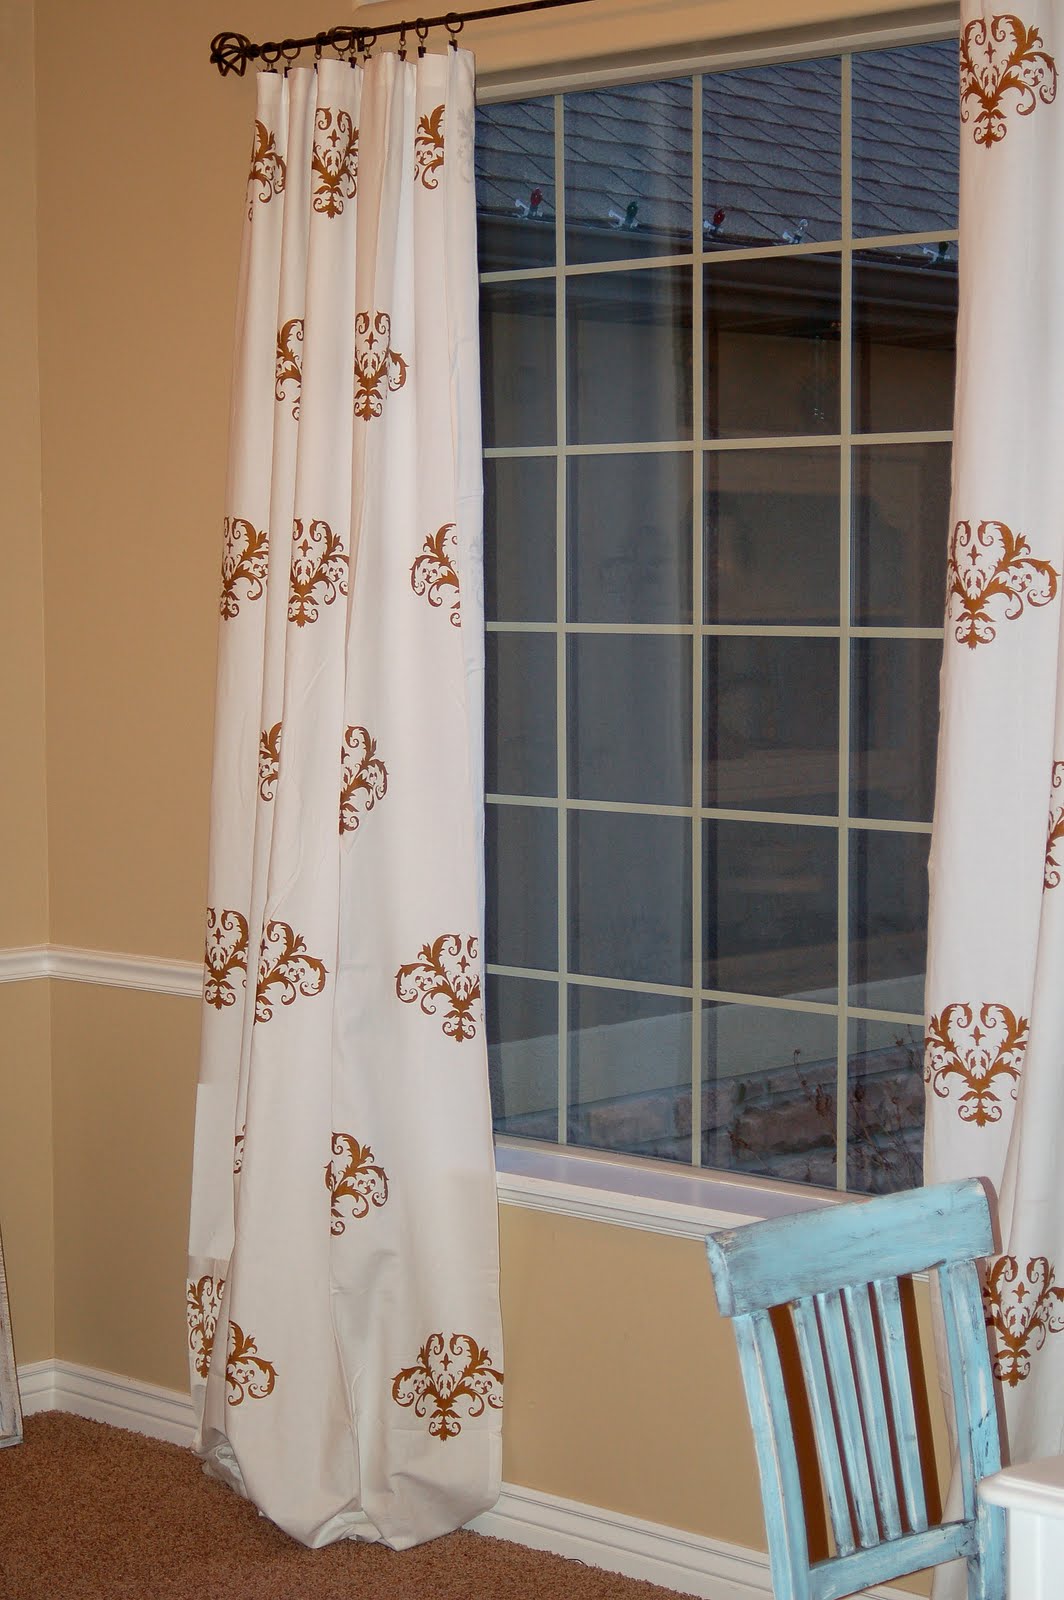
Here is a close up of the stencil. I love how big it is. You can't find fabric like this anywhere...I promise;)
I almost forgot...the curtains I bought were tab top. I don't know how you feel about those, but I am done with them. They are old news guys. So a quick way to fix that problem, if you have it, is to chop those bad boys off and hang the curtains up with these handy dandy clip ring thingers. You can find them everywhere...Joanns, Target, even Walmart. Its a quick way to update the look of your kinda out of style curtains! (sorry guys- but it's true- they have to go)


Friday, March 25, 2011

Vintage Revival- lampshade


I have had this old lamp shade for a really long time. I decided that it needed a little make-over!


I have been loving all of the projects that I have seen lately using pages from old books. Of course I have TONS of old books, because they are awesome, so I picked my least favorite and "borrowed" some pages. Don't worry, the book still looks great! and now so does my lamp shade!


This was a really simple lamp shade re-do. All I had to do was rip pages, paint on some mod podge, and smooth the page over the shade.


When the page is on, just rip the excess off. Ripped edges are the way to go on this project.


Then paint mod podge over the top.


I decided that it needed a little bling or something.....so I added a little flower guy. I used 3 more pages for this flower. I just folded them all separately accordion style, and then stacked them on top of each other and stapled them in the middle.


Then I just pulled the outsides toward each other, and used a little hot glue to hold it in place. Soooooo cute! Then I just cut a piece of black tulle in a circle. Then I just pinched the middle and glued it to the center of the paper flower. Easy, Easy. Then I sparkled an old button and glued it on top of that. And it's done!


What a cutie! :)


This was a fun and easy project. I actually made two to go on the end tables in my bedroom! I didn't have to go buy anything...it was FREE! They look like brand new lamps!


Wednesday, March 23, 2011

Stencil project #1

I am embarking on a stenciling journey! That sounds dumb I guess, but really, I am going to do a bunch of stenciled projects. First up is my kitchen table. One of the great things about stenciling is that it is cheap. It is also pretty easy, and makes a BIG statement. I guess the very first project I did was not this table, it was the wall in my daughters room. I will post pictures of that at the end of this post. For both the kitchen table, and the wall I used my cricut to cut out a stencil. I just cut it on card stock paper and it worked great! I like to cut a bunch out so that I can tape them all down in a row. It helps make sure everything is straight. For the table, I started in the middle down the center. I just lined them up and used a tape measure to make sure they were in the middle. Then I just taped them down.

Next I just started to stencil. Sorry this isn't the best picture, but you get the point. I used a sponge stencil brush and acrylic paint. When I finished a row I just moved the stencil over. It dries very quickly because you don't use very much paint.


When I was finished, I took a magic eraser (the Mr. Clean one used for cleaning) and I scrubbed it a little to give it a worn, distressed look. I love how it turned out. I think it looks a lot better distressed then it did all crisp and new. The color was too bold and cartoonish (is that a word?) before.


I love it a lot, but I wonder how long until I decide to change it again? The great thing about that is I can change it when I have a new wonderful idea pop into my head, and I don't have to feel bad because it was quick and cheap! I have decided that everyone should have an awesome old table to play with. No more boring kitchen tables! Add a little character to your space! I will let you in on a little secret...I have decided that when I get sick of the stencil, I am going to paint the table top with white board paint and let my kids color on it! Fun huh? And I love the idea of a glossy white finish, and it will wipe clean easily!


Below are some pictures of the stenciled wall I did in my babies nursery. I think it is my favorite wall of all time! I love it sooooo much! It looks like wallpaper, but it didn't ruin my wall like wall paper would! I used the same technique that I explained above for the table.


Tuesday, March 22, 2011

Ruffled Dish Towels

I got these dish towels from the DOLLAR STORE! I loved the color, but they were just too plain and boring. Soooo....I decided to add a little vintage charm.
I ripped some old fabric scraps into strips. You can make them as wide or as thin as you want. Then I just ruffled them! I use a ruffle foot on my sewing machine, but you can totally do it without.

Then I just pinned them on the towel where I wanted them, and sewed them on.

I added some cute little flowers to some.


Here is what the wider ruffle looks like.


These towels are a perfect way to add a pop of color in your kitchen! I really love the way they turned out! I am really loving ruffles, I have seen them in so many magazines and boutiques lately. If you liked this project, check out the post below....Ruffle pillows!


Saturday, March 19, 2011

Spring Ruffle Pillows!

Ruffles are all the rage right now. I see them everywhere! In magazines and in stores they are being used for just about everything. I love how chic and girly they look! As you know, I don't like to pay for stuff....especially if I have all the materials at home to build it myself! So, I made some ruffle pillows. They turned out soooo great! Here they are.....

I did one with just two ruffles down the middle, one on top of the other, and then I did one covered from top to bottom in ruffle, cuz I don't think you can ever have too many ruffles!


So here is how I did it...
First I found a bunch of random scraps of fabric that I had left over from other projects. Then I ripped them into strips. You can so whatever size you want. I think mine were about 2-3 inches. Then cut two squares of a different fabric the size you want your pillow.

Then I ruffled the fabric. I just got a ruffle foot for my sewing machine. I used to just make a ruffle by sewing a really loose stitch and then pulling one of the pieces of thread. That works too, but I would highly recommend a ruffle foot. Those things are awesome! Then I pinned the first ruffle on the pillow fabric.

Then I sewed it on, and moved to the next piece. Ruffle, and then sew it above the other ruffle. When you are done it looks like this...

Then I pinned all the ruffles up so that I didn't sew them while I was sewing up the pillow. Put right sides together and sew that thing up! Make sure you remember to leave a small hole for the stuffing.


Then stuff it, and sew up the hole. For the pillow with the ruffle down the center, just ruffle a piece or two of fabric down the middle and sew it on the fabric you have cut for your pillow. Then just sew up the pillow as mentioned above. These pillows are really fun and colorful for spring. Pillows make a great addition to any room and are a great way to add some accent color to your space.

Thursday, March 17, 2011

Fabric Easter Eggs

Everyone has ugly plastic easter eggs. They are good to put treats in, but definitely not good to decorate with. Well....we have to do something about that! I have glittered them before, but Im not really in love with that. I have also put Mod Podge and easter paper, but not really in love with that either. So I decided to use fabric and other embellishments like buttons, ric rac, ribbon, and jewels. All you need is plastic Easter eggs, scrap fabric, and any embellishments you want to use. This project was FREE for me to make. I had all the supplies in my craft closet, and you probably do too!
First, just rip the fabric into about 3/4 inch strips. Then just take your trusty glue gun and out a dab on top, and then start wrapping. I found that they turn out better if you go vertical and not horizontal on the egg. Just keep adding little dabs of glue here and there.

Keep turning the egg and wrapping until it is covered. It looks really cute with all the same fabric, or try adding a second fabric.

Add some embellishments, and your done! Fancy, fun and FREE!!!


I love the way they turned out! They look like something you would find at some expensive boutique for 10 bucks each. Can you believe they started out as those silly plastic eggs?


Wednesday, March 16, 2011

Quick and Easy Easter Craft

This project is a really quick and easy way to add a little Easter decor to your home. A fun vase or piece of pottery is a must-have in every home (in my opinion), and some curly willow is also a good thing to have around. I use this stuff all the time- for every season I think. I spray painted my curly willow white at Christmas time, and I loved it! At Christmas I had a white curly willow wreath hanging from my ceiling with gold sparkly ornaments hanging from it. It looked like a sweet chandelier! At Halloween I sprayed some black...It looked spooky, yet whimsical. I like it white for Easter, but just keeping it the natural wood color would look great too!

I used my cricut to cut out the egg stencil. If you don't have a cricut- buy one! Just kidding, I mean you should, but if you can't right now, just trace an egg shape on a piece of card stock paper and cut it out. You might want to use an exacto knife, or you could fold it and cut half an oval and then un-fold it and ta-da...you have an egg. (kinda like how you do the heart thing in elementary school???) does that make sense? I also cut the little tags out with my cricut. Or you could just cut a rectangle and punch a hole in the top.
You will also need acrylic paint, a stencil brush and some glitter.


Just put the stencil on top of the tag and stencil your little heart out! Remember- when you stencil don't paint like you normally would, you have to tap the paper with your brush making sure to keep the brush straight up and down so the paint doesn't bleed under the stencil. Also don't put a lot of paint on the brush. While the paint is still wet add some glitter. This is a good project for kids too. They make some pretty fun and creative eggs. They like to mix colors, they turn out pretty cool.


I hung the egg tags with Easter grass that you put in baskets. I used the paper kind, but I think the plastic would look good too. I like the way it really added a fun spring look to the project.


Have Fun!

Tuesday, March 15, 2011

D.I. treasures!

So...here they are, the treasures that I have found at the D.I! I have found some awesome things there in my many years of searching, this post I will show the most recent finds. These are seriosly my treasures! They make my heart happy:).


These old books I found for like 1-2 bucks a piece! I love love love them soooo much! I have some in a book shelf in my living room too. You can use books to decorate just about anywhere. They are perfect to stack and add some height to your decor. I think when a book is old and worn, there is just something about it. You know someone loved and enjoyed it....you know there is a story behind it (punny huh?) There are so many colors too! My favorite book I found is the turquoise one. Its titled Gospel Ideals written by David O. Mckay! You can find crazy and interesting books there. I am intrigued...I will read some of them. One of my books, the really worn looking one under the turquoise one is Clear and Present Danger and It's from the Spanish Fork High school library! I bet my dad or Grandpa checked it out in the olden days!;)

This crazy lamp you see is my masterpiece! I saw a tutorial on Studio 5 one day. This awesome girl named Mandy Gubler was on the show teaching how to make this Anthropologie knock-off. The original costs over 200 bucks! I went right to D.I to find some sweet tea cups and plates, and went to work. It is one of my favorite pieces I have in my home. I love that its so different. It is quite a conversation piece if you can imagine. If you are interested in making this little guy, just leave a comment, or send an e-mail and I can give you some directions. I promise to have some great tutorials coming soon!

I went to D.I yesterday and look what I found! These white plates are AMAZING! I am in Love! Can you believe I found these at D.I for $1 a piece? I can't. So I learned a new trick yesterday. I was looking through some stuff in what they call "the yard" and I noticed some people standing around and I thought to myself....hmmmmm I think they know something I don't know. Then sure enough, the big double doors came flying open and a lady walked out with new junk on her little cart. Apparently they do this throughout the day everyday. The poor little lady got attacked! I was part of that. It was so fun! Like winning a prize! That is how I got these lovely little ladies!


What do you think? Perdy right?


I think I will use some for cake plates. And some in my Curio.


I hung some above my dinning room windows.


So this Orange pot I found on my treasure hunt is just sitting on the top of the pot rack in my kitchen. I just loved the color and how it looks old....so I bought it. Oh, and I loved the price. 50 cents!


Last, but not least i found these little wicker baskets. I am going to give them a makeover and use them for my girlies Easter baskets. Stay tuned to see how they turn out!