Thanks for visiting us here at I Adore This.

This blog is dedicated to sharing things that i adore!. You will usually find a quick tip or trick on how to update or change furniture, decorations or crafts but depending on my mood you will also be exposed to storage ideas, management tips and all other types of things that come with raising and interacting with little girls.


Monday, August 15, 2011

Lamp Re-do

This lamp was really fun, and I adore it! I made it for a little craft fair booth I did this summer. I didn't make it to sell, just to decorate my booth...but I could have sold it in a second because I had sooooo many people ask me if it was for sale. When I said no they asked if I would sell it anyway. I guess I maybe should have! A lot of ladies came into the booth to inspect the lamp and see how I did it. They were amazed to find out that it was really fast and simple. But your not surprised right? I am all about fast and simple! Oh, and ruffles! I have the lamp in my babies nursery now. It is a perfect addition to her sweet little room.

Here is what the lamp looked like before....BORING!


I ruffled 3 strips of fabric. Then I simply hot glued each strip onto the shade. That's it! Easy huh?


Then I just spray painted the lamp base. I LOVE spray paint. It's like magic!


The great thing about this is that you can make it to match any color scheme. There is such cute fabric out there- you could make a lamp shade and pillows to match! I love anything you can customize with fabric. It gives a room a splash of color and personality.

Wednesday, August 3, 2011

Thats right....its a new post!!!

Can you believe I am finally posting something? I have had a crazy busy summer! No time for building and creating things. It has been sad, I have missed creating and blogging....but I'm back now! So for my first project I decided to finally do something about the hideous chairs in my garage. Take a look at these beauties!
All I did first was take the seat off and strip the fabric. Then I grabbed a can of my favorite spray paint and let 'er have it! I love the ocean breeze color by Krylon. Then with the seat part I just got some cute fabric that matches the paint and cut it just a little bigger than my seat.


Then I just hot glued the fabric around the seat. All you have to remember is to pull it tight, and kind of gather it on the corners. EASY! This part took about 5 minutes.


Then I trimmed the excess and that's it....its done!


Different seats attach to the chair in different ways. This one just kind of clicks in, but I think the other ones I have screw in. Either way, it's pretty easy. It is well worth the 30 minutes it will take you to spray paint and re-do the seat. Look at how amazing it looks now....


I also did one the green color that is in the fabric. It turned out darling too. They look so cute together. They used to be an embarrassment that I would never take out and have a friend sit on, but now they are the conversation at the party! I have 2 more that I am going to finish today. I am just going to do one more green one and another blue one. They will be a fun little set that I will use for lots of fun stuff!


Wednesday, June 22, 2011

Party Decor Ideas (cheap and easy!)

First of all... sorry it has been so long since I have added a new post. I have been on vacation, and also just super busy with the kids being home for summer! This post is inspired by the Birthday parties I have thrown for two of my little girls the last couple of months. These ideas are quick, cheap, and easy! I guess that's kind of the theme here on this blog...and my house! Also, most of these projects can be done with items you already have in your home.


Above is a paper cupcake baking cup garland. It turned out darling! I used 3 different designs. All you have to do is get a needle, thread some thick thread, or fishing line through it, and then slide the cups right on. String them facing different ways in a random pattern. Make it as long as you want and hang it up! This is a really fun decoration for a Birthday party, baby shower, wedding shower, or any kind of party. Red, White, and Blue would look so awesome for a 4th of July BBQ!


These little cupcake picks really add a lot to a cupcake. These are baby bottles that I cut out with my cricut and then hot glued to a tooth pick and stuck it right into the cupcake. Perfect for a baby shower! For a Birthday party you could personalize it for the Birthday girl or boy. My daughter loves everything pink, so for her Birthday I did a sparkly pink and turquoise present cut-out on a toothpick. She loved it! You could do princess crowns, dinosaurs, cars, whatever...the possibilities are endless! Once again....think Red, White and Blue for your summer BBQ!


Next are my very favorite party decorations! I love them so much because they are HUGE! I can't think of a better way to add a pop of color to a room than with these. I am sure you have all seen these, but if not, here is a quick tutorial on how to make an awesome "puff ball". 1- see above picture...take 8 sheets of tissue paper and lay them on top of each other. Then fold them into a 1 1/2 inch fan. Then I like to loosely tape the middle. then tie a long piece of fishing line in the middle.


2- Start to carefully pull each piece away from the other. alternate sides.


3- Now you have one half done! ow do the other side the same way. When you have done both sides you have your "puff ball!" You will have to move each piece around a little until it looks nice and full.


4- Hang them up and enjoy!


My last idea for this post is a little thing I did this week for my daughter Brielle's Birthday. I wanted to make her feel special on her special day so I cut her name out with my cricut, and then just used some cute clothes pins that we painted and hung them up on a pennant banner that we already had hanging on the fireplace. I love when you can add to an existing decoration.


This is a really easy way to decorate for someones Birthday without spending much time or money. Think of a way to add their name, or favorite thing to your current decor. This way, it looks great. like you spent lots of time, but really you just embellished an existing look. Also...It does away with those cheesy dollar store Birthday signs! YAY! (sorry if you love those!)


Wednesday, June 1, 2011

Bedroom Makeover!

A good friend of mine asked me to come over and help with some ideas for her little girls room she was working on. I came over expecting to see a big mess that needed a lot of help, and this is what I saw! It was love at first sight! I was so impressed! She did an amazing job. She was looking for a little more though. She wanted an idea on how to add more color to the room. I usually go straight to window treatments. This room was a little more tricky because she has those awesome plantation shutters on the windows, so curtains would not work. I gave her the idea of a 
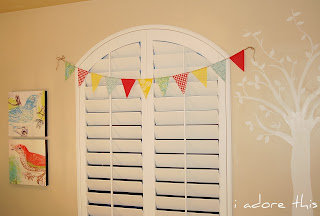
pennant banner. She went and picked out fabric and we made a killer banner!
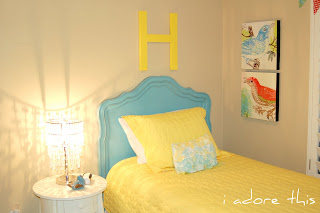
It turned out AMAZING! It really added the pop of color to the room that she was looking for. It was really simple and we had a lot of fun doing it.
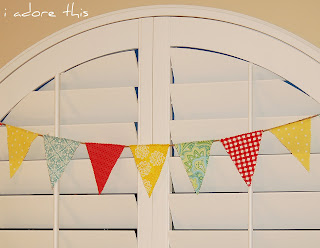
We didn't even use a sewing machine! Here is a quick tutorial on how to make your own pennant banner:
1-Find some awesome fabric
2-Get a ruler and a piece of card stock paper and make a triangle the size you like.
3-Cut the fabric using the paper pattern you just made.
4-I used pinking shears to go around the edges of the triangles. This helps keep the fabric from fraying, and adds a fun bit of texture to the fabric.
5- get out the hot glue gun and glue those bad boys on! We used jute, but depending on the look you are going for you could use anything. Ribbon, ric-rac, or even rope.
6-Hang it up and enjoy!


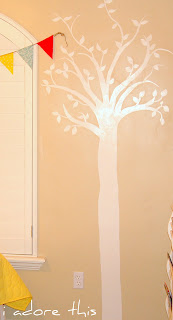
We decided that the room needed a big tree. So what did I do? Yep- I painted one right on the wall! My friend was a little nervous I think, but willing to give it a try. (the vinyl ones we found were SUPER expensive!) Her husband had access to a projector at work, so we had him bring it home. I painted trees on my own wall free hand, but I was too scared to do that on hers. So we found an image of a tree that we loved, and projected it onto the wall. Then I traced it, and then painted it. It took about 4 coats of paint, but it turned out great! I adore this!


This room is amazing! I had tons of fun helping with it. Thanks Amy!


Tuesday, May 24, 2011

EASY Burlap Wreath

This wreath is a perfect summer wreath for your front door, or anywhere. It is super simple and fun to make. The items you will need for this project are listed below.
1- Some kind of wreath form. I just bought a wreath from the dollar store.
2- Burlap. Any color, you will need less than a yard.
3- Scissors and hot glue
4-something fun to put on wreath....ie. I cut a letter "B" out of a sheet of moss. You could use anything like a small birds nest, flowers, whatever you want.
First I just cut long strips out of burlap. you will need 2 long strips. One strip wider than the other. (about double the width.) Then I just started to glue it on the wreath. I just put the hot glue on the wreath and layed the burlap on top and pinched it about every 1/2 inch. This makes it look cute and ruffled.


Ruffle it all the way around. Then do the same with the thinner strip right on top of the piece already glued on the wreath.


Then I just added the "B" I cut out of a sheet of moss that I found at the dollar store and tied it on with ribbon.


Wednesday, May 11, 2011

Book Page Accent Ball

There are a lot of fun accent balls out there. They are used to decorate anything and everything! Put them in a bowl, on a candlestick, or book shelf. Make a topiary, or just stick it in a pot. The possibilities are endless! I have loved the project I have done thus far with book pages, so I thought why not try a ball? It turned out awesome! I adore this!
First I just got a little ball from the dollar store. Then I Mod Podged the book pages right onto the ball. It doesn't have to look pretty, you wont see this part very much.


Then I cut a bunch of pages into large circles, and then I cut the circle into a spiral.


Next, just start from the outside and start to roll inward.


Look how cute! It turns into a darling rosette!


All you need to do now is hot glue those rosettes onto the ball. Easy huh?


Look how great it turned out!! I think this would look awesome displayed anyway you could think of. I am thinking way ahead here, but I think some of these little guys might end up on my Christmas tree this year!


Friday, May 6, 2011

Stenciled Burlap Pillows

I'm sure you all know that Burlap is a HUGE new trend right now. I did the spring pennant banner a few posts ago. This is the same idea, but on a pillow. I love these! They are cheap, easy, and you can personalize it however you want! Whats not to love right?


Supplies needed: acrylic paint, a stencil brush, stencil, burlap, and pillow insert or stuffing.

I cut my stencils out with my cricut. I think I mentioned on a previous post that I found really great stencils at Hobby Lobby. You could even draw an awesome design on a piece of card stock and cut it out with an X-acto knife if you want to get crazy and creative!


I did a "B" for our last name. It would also work for a first name to throw on a bed or something:)


After you have gathered the few supplies needed, cut 2 pieces of burlap the size you want your pillow. Now you can either sew the 3 sides together, or you can stencil on one side, and then sew. It works either way. If you decide to sew first, make sure you put something inside the pillow to before you stencil so that it doesn't bleed through. Easy easy! I think it would be fun to do a crown or a chandelier stencil for a little girls room. I love that you can do what ever color and design you want....customize for your space.

It was my daughters B-day, so I did a cupcake one! She loved it!


Thursday, April 28, 2011

Ruffle Pants!

This blog is dedicated to making old things new again....so This week my project is to make my daughters old pants new again and better than before! They were floods on her, so she couldn't wear them any more, but they still fit perfectly in the waist. That happens all the time and always makes me sad because it's such a waste of perfectly good pants. Another problem I have encountered is holes in the knees! You can do this same thing with those. They just might need to be cut a little higher- they could be shorts instead of Capri's. Below is a quick tutorial on how to make these darling ruffle pants.

1- Find old pants.


2- Cut them wherever you want. If they have holes cut them just above the holes. If not, and you want to make capri's cut them just below the knee. You will need to use the pieces you cut off as connector pieces. Cut them to be about 2-2 1/2 inches wide.


3- Get 2 different kinds of fabric. 1 yard long. cut the fabric 2 1/2 inches x 1 yard. Do this to both pieces. You can use the same fabric for both ruffles if you want, or do them different.

4- Sew along one side of the strip of fabric with a tight zig zag stitch. then fold it over the zig zag and hem it up. If you have a surger, surge it instead of zig zag.


5-Next you are going to ruffle the strip of fabric. If you have a ruffle foot that works, but it's easy to do it without to. First adjust your sewing machine to a long stitch. Sew a straight line along the top edge that you want to gather. (edge opposite the hemmed edge.) Pull one of the threads to gather. I find that pulling the needle thread (the top one) works best for me.


6- Get the ruffles how you want them, and then pin them on the pants rights sides together so the ruffle is laying up on the pants.


7- Stitch the ruffle to the pants.


8- Next you will need the connector piece that you saved. Place the top connector section right sides to the pant, with the ruffle in between. Stitch in place.


9- Turn the connector piece down. Pin the next ruffle right sides together to the raw edge of the connector piece. Stitch in place.


10- Turn the ruffles down and press. Now just put a top stitch just above the seam of both ruffles- this will help the ruffles lay down properly.


All done!!


These are so cute and girly! All of my girls love these, even my 10 year old! You can add just one ruffle if you would like or even three! This funky and fun style is the perfect way to get more life out of those pants you would have just thrown away!